
Contents
A friend of mine is very successful with his career and he is extremely good with numbers. He enjoys trips to Vegas and spends quite a bit of time at the blackjack table. However, he never bothered to memorize the blackjack basic strategy chart and he doesn’t bring it with him. As such, his blackjack strategy is inconsistent and unprofitable. Following the simple basic strategy chart would save my friend a lot of money but I can’t force him to do it. Hopefully you’ll spend a few minutes on this site and memorize the chart and/or print it out and bring it with you. Blackjack doesn’t require as much thought as poker but I do make sure to follow the basic strategy chart.
The simplest strategy is to print the basic strategy chart and keep it with you when playing blackjack.
We have a printable version here: blackjack-chart.com. If you don’t want to print it out then at least take a screen shot picture of it on your phone.
Below is a copy of the most common (and most accurate!) blackjack chart you should use if you’re playing blackjack in Las Vegas with a shoe:
Eight Deck Shoe Blackjack Basic Strategy Chart
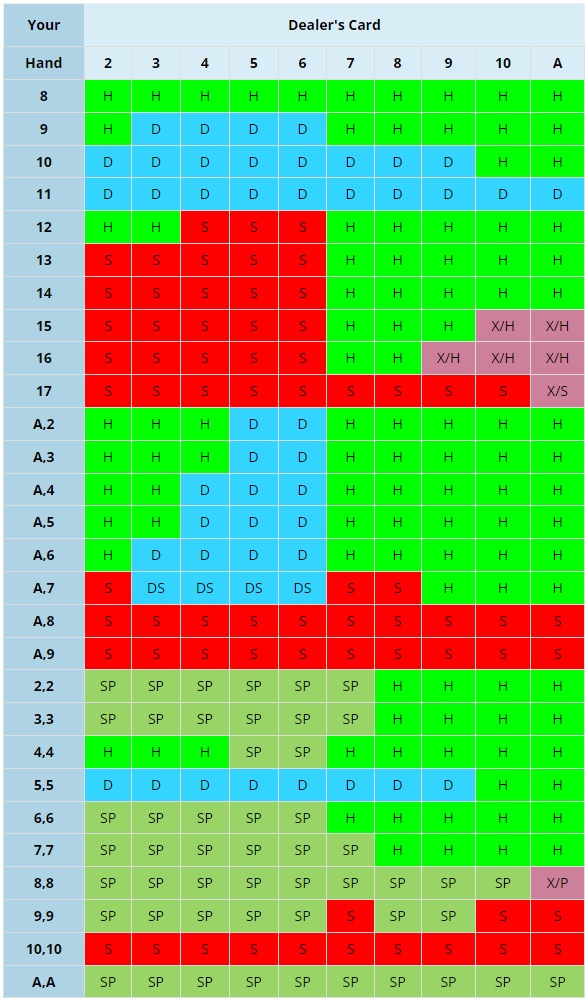
The above basic strategy blackjack chart assumes typical Vegas-style rulese:
Multiple decks.
Double down allowed on any 2 cards.
Double after splits allowed.
Dealer hits soft 17.
Blackjack Chart Legend
H Hit
S Stand
D Double if allowed, otherwise Hit
DS Double if allowed, otherwise Stand
SP Split
X/H Surrender if allowed, otherwise Hit
X/P Surrender if allowed, otherwise Split
X/S Surrender if allowed, otherwise Stand
Not sure how to use the basic strategy chart? Choose a square on the chart and then try to decide what the chart is saying to do in that situation. Use our blackjack calculator tool to check your answer.
Start by knowing the difference between “hard hands” and “soft hands.” A soft hand contains an ace and a hard hand does not.
Looking at hard hands:
8 or lower is a hit.
9 to 11 is a double or a hit.
12 is a hit against anything but 4, 5, or 6 where it is a stand.
Assuming surrender is not allowed then 13 to 16 are hits unless the dealer has 6 or less where we stand.
17 or higher is a stand (assuming surrender isn’t allowed for 17 vs A).
The above is all evident in the basic strategy chart on our home page. Look at the chart to see how the above statements are represented then use the chart for other situations like pairs and soft hands.
Mistakes by Volume
Using our blackjack trainer tool, we’ve been able to collect a lot of data which allows us to show you the most common mistakes people make by volume. Note that some cells in the basic strategy chart occur much more than other cells. One way this is obvious is by seeing that T, J, Q and K are combined. As such, it makes sense that the most mistakes in our blackjack trainer database are from high volume cells.
The more blue a cell is, the more mistakes by volume we see.
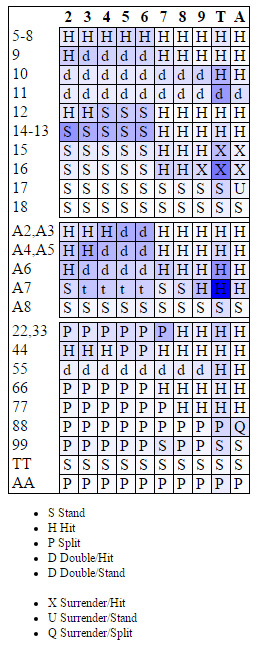
Noteworthy Mistakes by Volume:
A, 7 vs T is a big mistake by volume.
This is probably because this situation comes up frequently in the “hard mode” version of our trainer. It isn’t easy to hit a soft 18 but that’s what needs to be done when the dealer is showing a broadway card (T, J, Q, or K).
16 vs T is also a big mistake by volume.
Surrendering is a pain, especially when the dealers and other players tease you for it. Still, it needs to be done here.
Mistakes by Ratio
This chart measures the cells where people make the highest percentage of mistakes. Some of the hands like 8, 8 vs A don’t occur often but when they do come up people make the wrong choice a high percentage of the time.
The more red a cell is, the more mistakes by ratio we see.
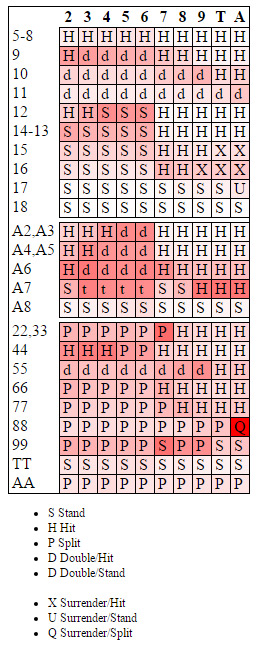
Noteworthy Mistakes by Ratio:
88 vs A is a big mistake by ratio.
People get used to splitting 8s but it is better to just surrender against an ace.
22 & 33 vs 7 is another big mistake by ratio.
Many people get this wrong because it is scary to split against a 7.
44 vs 3 or 4.
This is a helpful reminder that we don’t split a pair of fours against 3 or 4.
Again, the blackjack basic strategy chart on our home page can be intimidating the first time you see it but don’t let that discourage you. Once you take a few minutes to learn how to read it then it makes all the difference in the world between winning and losing. Again, use the free blackjack trainer on our home page to make sure you’re reading the strategy chart correctly.
Leave Your Feedback Below!
Submit your review | |